本文是一篇云计算高可用架构部署指南,详细记录了从单节点到 L4 全面高可用架构的构建过程。无论你是运维工程师、开发者还是学习者,都可以根据本文的步骤,使用 LNMP【1】 技术栈完成 Web 层、数据库层和存储层的高可用部署与验证。本指南以可复现为目标,涵盖命令、配置、验证方法及常见问题解决方案,帮助你快速掌握云计算高可用架构的落地实践。
前置条件与约定
系统:CentOS Stream 9(等价 RHEL9【2】 系)
软件栈:Nginx【3】 + PHP-FPM【4】 + WordPress【5】、MariaDB【6】、HAProxy【7】、Keepalived【8】、MaxScale【9】、GlusterFS【10】
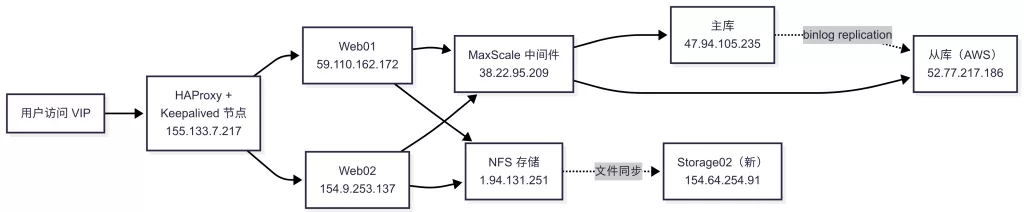
角色与示例 IP(可按需替换):
| 角色 | 主机名 | 示例 IP |
|---|---|---|
| Web01 | web01 | 59.110.162.172 |
| Web02 | web02 | 154.9.253.137 |
| LB/HAProxy + Keepalived | lb01 | (自定) |
| VIP【11】 | - | 155.133.7.217 |
| DB 主 | db01 | 47.94.105.235 |
| DB 从 | db02 | 52.77.217.186 |
| MaxScale | maxscale01 | 38.22.95.209 |
| NFS【12】/Gluster 节点 A | nfs01 | 1.94.131.251 |
| NFS/Gluster 节点 B | nfs02 | 154.64.254.91 |
变量化建议(每台主机都可先写入):
# -- 根据你的环境修改 --
export WEB_ROOT=/var/www/html/wordpress
export UPLOADS=$WEB_ROOT/wp-content/uploads
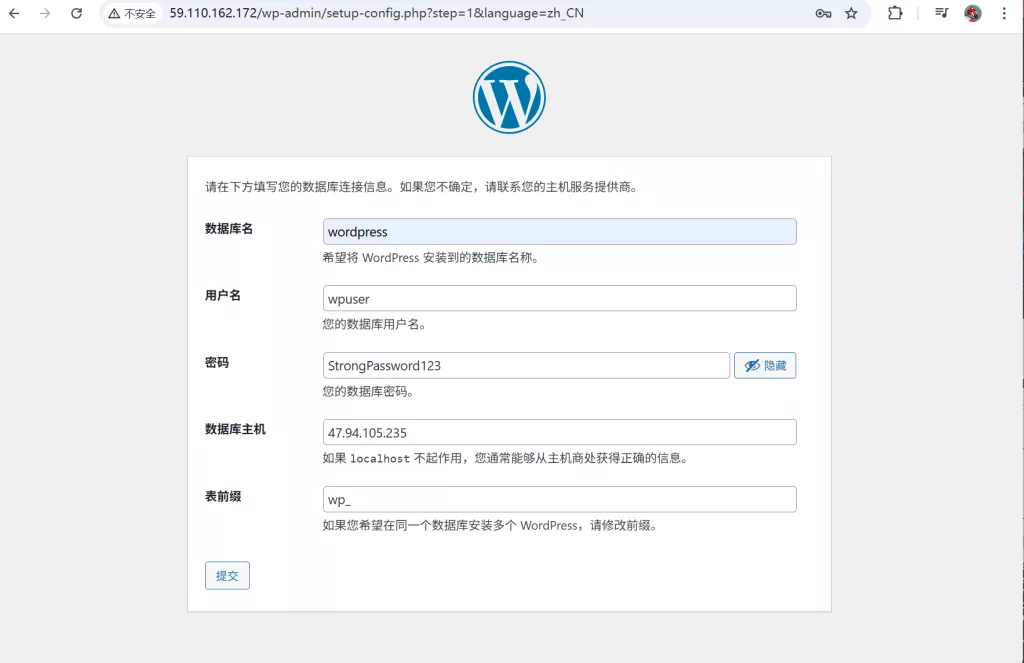
export DB_NAME=wordpress
export DB_USER=wpuser
export DB_PASS='StrongPassword123' # 生产请改强口令
export DB_HOST=47.94.105.235 # L3 后将指向 MaxScale
export VIP=155.133.7.217通用约定
- 若无特别说明,命令均以 root 身份执行(或前置
sudo)。 - 防火墙与 SELinux【13】:实验环境可放宽;生产必须最小化放行并保留 SELinux(见文末加固)。
- 分阶段验收:每个阶段完成后务必跑完“验证清单”,否则不要进入下一阶段。
阶段总览(L1→L4)
- L1:搭建 LNMP + 单节点 MariaDB + NFS 共享,确保 WordPress 正常运行与媒体可写。
- L2:新增一台 Web,使用 HAProxy 轮询 + Keepalived 提供 VIP,对外统一入口,保障 Web 层故障不影响访问。
- L3:MariaDB 主从复制,前置 MaxScale(读写分离 + 自动故障切换),数据库层去单点。
- L4:以 GlusterFS 副本卷替换单点 NFS,文件读写具备副本冗余与自愈能力。
L1 基础架构:单 Web + 单 DB + 单存储
目标
- WordPress 可安装访问;
- 图片/附件可上传(写入共享目录);
- Web ↔ DB 连通,账号授权正确;
- NFS 挂载持久化。
实施步骤
1)Web:Nginx + PHP-FPM + WordPress
# 基础工具
sudo dnf -y update && sudo dnf -y install vim wget curl net-tools firewalld
sudo systemctl enable --now firewalld
sudo firewall-cmd --add-service=http --permanent
sudo firewall-cmd --add-service=https --permanent
sudo firewall-cmd --reload

# Nginx + PHP 组件
sudo dnf -y install nginx
sudo systemctl enable --now nginx
sudo dnf -y install php php-fpm php-mysqlnd php-gd php-json php-mbstring php-xml php-zip php-curl php-opcache

# 统一 PHP-FPM 运行用户为 nginx
sudo sed -i 's/^user =.*/user = nginx/' /etc/php-fpm.d/www.conf
sudo sed -i 's/^group =.*/group = nginx/' /etc/php-fpm.d/www.conf
sudo systemctl enable --now php-fpm

# WordPress 部署
sudo mkdir -p /var/www/html
cd /var/www/html
sudo wget https://cn.wordpress.org/latest-zh_CN.tar.gz
sudo tar -xzf latest-zh_CN.tar.gz && sudo rm -f latest-zh_CN.tar.gz
sudo mv wordpress $WEB_ROOT
sudo chown -R nginx:nginx $WEB_ROOT && sudo chmod -R 755 $WEB_ROOT

# Nginx 站点(最小可用)
cat <<'CONF' | sudo tee /etc/nginx/conf.d/wordpress.conf
server {
  listen 80;
  server_name _;
  root /var/www/html/wordpress;
  index index.php index.html;
  location / { try_files $uri $uri/ /index.php?$args; }
  location ~ \.php$ {
    fastcgi_pass unix:/run/php-fpm/www.sock;
    fastcgi_param SCRIPT_FILENAME $document_root$fastcgi_script_name;
    include fastcgi_params;
  }
}
CONF
sudo nginx -t && sudo systemctl reload nginx
2)DB:MariaDB 安装与初始化
sudo dnf -y install mariadb-server
sudo systemctl enable --now mariadb
sudo mysql_secure_installation   # 按需设置 root 密码、清理匿名、允许/禁止远程

# 创建库与应用用户(将 host 限定为 Web01/02 的 IP 更安全)
mysql -uroot -p <<SQL
CREATE DATABASE IF NOT EXISTS ${DB_NAME} DEFAULT CHARACTER SET utf8mb4 COLLATE utf8mb4_general_ci;
CREATE USER IF NOT EXISTS '${DB_USER}'@'59.110.162.172' IDENTIFIED BY '${DB_PASS}';
GRANT ALL PRIVILEGES ON ${DB_NAME}.* TO '${DB_USER}'@'59.110.162.172';
FLUSH PRIVILEGES;
SQL
3)存储:NFS 共享(在 nfs01)
sudo dnf -y install nfs-utils
sudo systemctl enable --now nfs-server
sudo mkdir -p /mnt/wp-shared && sudo chown -R nobody:nobody /mnt/wp-shared && sudo chmod -R 777 /mnt/wp-shared
# 导出给 Web01(先从单机开始,L2 再加 Web02)
echo "/mnt/wp-shared 59.110.162.172(rw,sync,no_root_squash,no_subtree_check)" | sudo tee -a /etc/exports
sudo exportfs -arv
4)Web 挂载 NFS(在 web01)
sudo dnf -y install nfs-utils
sudo mkdir -p $UPLOADS
sudo mount -t nfs 1.94.131.251:/mnt/wp-shared $UPLOADS
# 持久化
echo "1.94.131.251:/mnt/wp-shared $UPLOADS nfs defaults,_netdev 0 0" | sudo tee -a /etc/fstab
sudo mount -a && df -h | grep wp-content
5)运行安装向导
- 访问
http://<web01 公网IP>/完成 WordPress 安装; - 如提示无法创建
wp-config.php,则在$WEB_ROOT手动创建并设置权限:
sudo chown nginx:nginx $WEB_ROOT/wp-config.php && sudo chmod 640 $WEB_ROOT/wp-config.php
验证清单(必须全部通过)
- 浏览器能打开首页与后台;
- 新建文章可保存;
- 媒体上传成功,文件落在 nfs01 的
/mnt/wp-shared; - 重启 web01 后 NFS 仍自动挂载(
/etc/fstab生效)。
常见坑 & 快速修复
- 上传失败/没有写权限:统一
php-fpm运行用户与目录属主为nginx。 - DB 拒绝访问:确认
GRANT中的来源主机是 Web 的实际 IP;开放3306。
回滚建议
- 站点不可用时:
nginx -t校验;回退conf.d/wordpress.conf的最近改动;从 NFS 切回本地目录(改root)以应急只读访问。
L2 Web 层高可用:双 Web + 负载均衡 + VIP
目标
- 两台 Web 等价提供服务;
- HAProxy 轮询转发并健康检查;
- Keepalived 提供对外唯一入口(VIP),主备漂移无感。

实施步骤
1)准备 web02
- 同步 web01 的 Nginx/PHP/WordPress 版本与站点目录结构;
- 追加 NFS 导出(在 nfs01):
echo "/mnt/wp-shared 154.9.253.137(rw,sync,no_root_squash,no_subtree_check)" | sudo tee -a /etc/exports
sudo exportfs -arv- web02 挂载 NFS 并持久化:
sudo mkdir -p $UPLOADS
sudo mount -t nfs 1.94.131.251:/mnt/wp-shared $UPLOADS
echo "1.94.131.251:/mnt/wp-shared $UPLOADS nfs defaults,_netdev 0 0" | sudo tee -a /etc/fstab
sudo mount -a
sudo chown -R nginx:nginx $UPLOADS
2)HAProxy(lb01)
sudo dnf -y install haproxy firewalld && sudo systemctl enable --now firewalld
sudo firewall-cmd --permanent --add-port=80/tcp && sudo firewall-cmd --reload
cat <<'HAP' | sudo tee /etc/haproxy/haproxy.cfg
global
  log /dev/log local0
  maxconn 2048
  daemon

defaults
  log global
  option httplog
  option dontlognull
  timeout connect 5s
  timeout client 30s
  timeout server 30s

# 健康检查:建议提供 /health.php 返回 200\ nfrontend http_front
  bind *:80
  mode http
  default_backend web_servers

backend web_servers
  balance roundrobin
  mode http
  option httpchk GET /health.php
  server web01 59.110.162.172:80 check
  server web02 154.9.253.137:80 check
HAP
sudo haproxy -c -f /etc/haproxy/haproxy.cfg && sudo systemctl restart haproxy
在两台 Web 根目录添加 health.php:
cat <<'PHP' | sudo tee $WEB_ROOT/health.php
<?php http_response_code(200); echo "OK"; ?>
PHP
sudo chown nginx:nginx $WEB_ROOT/health.php
3)Keepalived(lb01 与备份 lb02 可选)
sudo dnf -y install keepalived
cat <<KV | sudo tee /etc/keepalived/keepalived.conf
vrrp_instance VI_1 {
  state MASTER
  interface eth0              # 按网卡名调整
  virtual_router_id 51
  priority 100
  advert_int 1
  authentication { auth_type PASS; auth_pass 1234; }
  virtual_ipaddress { ${VIP} }
}
KV
sudo systemctl enable --now keepalived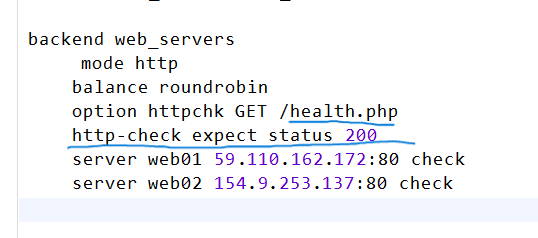
注意:域名访问:移动端浏览器常对 http + IP 做限制,建议绑定域名到 VIP,再配合 HTTPS。
验证清单
- 访问 VIP 可见站点;
- 停止 web01 的 Nginx:
systemctl stop nginx,请求应自动切到 web02;恢复后回到轮询; - 访问
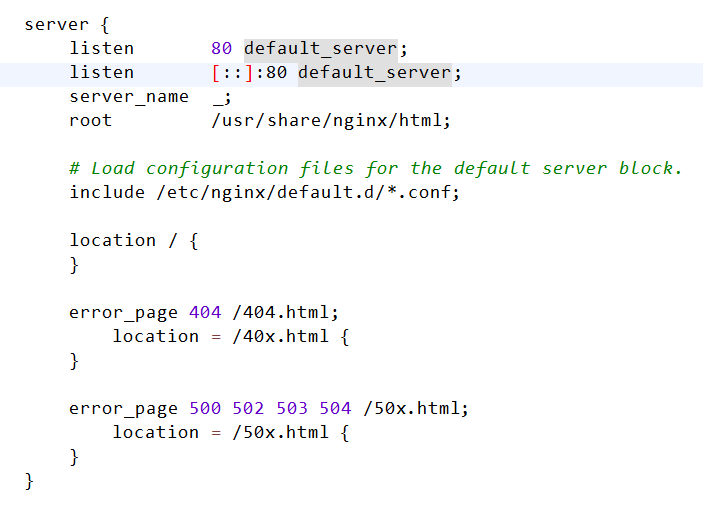
/health.php返回OK; - Nginx 不再出现默认首页(如有,删除
default_server)。
常见坑 & 快速修复
- 只显示默认页:检查
/etc/nginx/nginx.conf是否启用了default_server;确保conf.d/wordpress.conf生效。 - 手机访问不了 VIP:用域名访问,或直接开启 HTTPS;排除运营商劫持。
回滚建议
- 临时下线某台 Web:在 HAProxy 将其
disabled或weight 0; - HAProxy 故障:将域名临时指回 Web01 公网 IP 做直连(降级架构)。
L3 数据库高可用:主从 + MaxScale 自动切换
目标
- MariaDB GTID【14】 主从复制;
- MaxScale 自动探测主库并读写分离;
- 主库宕机后,从库接管写入,站点无感继续运行。

实施步骤
1)主库(db01)开启 GTID 与 binlog【15】
cat <<'CNF' | sudo tee /etc/my.cnf.d/mariadb-server.cnf
[mysqld]
server-id=1
log-bin=mysql-bin
binlog-format=mixed
gtid_strict_mode=ON
CNF
sudo systemctl restart mariadb
创建复制与监控用户(注意来源主机限制):
CREATE USER IF NOT EXISTS 'repl'@'%' IDENTIFIED BY 'replpass';
GRANT REPLICATION SLAVE ON *.* TO 'repl'@'%';

CREATE USER IF NOT EXISTS 'maxuser'@'38.22.95.209' IDENTIFIED BY 'maxpass';
GRANT REPLICATION CLIENT, REPLICATION SLAVE, SLAVE MONITOR, READ_ONLY ADMIN ON *.* TO 'maxuser'@'38.22.95.209';
2)从库(db02)配置复制
cat <<'CNF' | sudo tee /etc/my.cnf.d/mariadb-server.cnf
[mysqld]
server-id=2
log-bin=mysql-bin
binlog-format=mixed
gtid_strict_mode=ON
CNF
sudo systemctl restart mariadb

# 和主库对齐数据(推荐使用 --single-transaction 方式导入主库导出)
# 导入完成后:
mysql -uroot -p -e "STOP SLAVE; CHANGE MASTER TO MASTER_HOST='47.94.105.235', MASTER_USER='repl', MASTER_PASSWORD='replpass', MASTER_USE_GTID=slave_pos; START SLAVE;"
mysql -uroot -p -e "SHOW SLAVE STATUS\G"   # 两项都 YES
3)MaxScale(maxscale01)读写分离与故障切换
# 安装
curl -sSL https://downloads.mariadb.com/MariaDB/mariadb_repo_setup | sudo bash
sudo dnf -y install maxscale && sudo systemctl enable --now maxscale

# 开放 3306
sudo firewall-cmd --permanent --add-port=3306/tcp && sudo firewall-cmd --reload

# 配置
cat <<'MS' | sudo tee /etc/maxscale.cnf
[maxscale]
threads=auto

[replication_monitor]
type=monitor
module=mariadbmon
servers=db1,db2
user=maxuser
password=maxpass
monitor_interval=2000ms
auto_failover=true
auto_rejoin=true
enforce_read_only_slaves=true

[Read-Write-Service]
type=service
router=readwritesplit
servers=db1,db2
user=wpuser
password=StrongPassword123
max_slave_connections=1

[Read-Write-Listener]
type=listener
service=Read-Write-Service
protocol=MariaDBClient
port=3306

[db1]
type=server
address=47.94.105.235
port=3306
protocol=MariaDBBackend

[db2]
type=server
address=52.77.217.186
port=3306
protocol=MariaDBBackend
MS

sudo systemctl restart maxscale
maxctrl list servers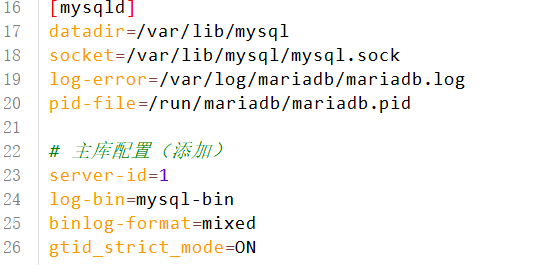
4)Web 指向 MaxScale
- 在两台 Web 的
wp-config.php中,将DB_HOST改为maxscale01的地址(或其 IP38.22.95.209)。


验证清单
maxctrl list servers:主/从角色识别正确;- 关闭主库
systemctl stop mariadb后,文章发布/评论仍成功; - 恢复主库后,写入自动回切(或保持从库为主视实际策略)。
常见坑 & 快速修复
- MaxScale 无法监控:
maxuser权限不足(需SLAVE MONITOR、READ_ONLY ADMIN)。 - 应用仍连不上:为
wpuser针对 MaxScale 来源 IP 单独授权;必要时给予只读mysql.*的SELECT以支持认证流程。 - GTID 不一致:在从库按需
SET GLOBAL sql_slave_skip_counter = 1跳过出错事务后START SLAVE(谨慎用,记录变更)。
回滚建议
- MaxScale 故障:临时把
DB_HOST指回主库; - 复制链路异常:停止写入→备份→重新全量同步(
mysqldump --single-transaction)。
L4 存储高可用:GlusterFS 副本卷
目标
- 以 GlusterFS 副本卷(replica 2)替代单点 NFS;
- 任一存储节点宕机,Web 侧文件读写不受影响;
- 故障恢复后自动愈合(heal)。
实施步骤
1)两节点部署 & 互信(nfs01/nfs02)
sudo dnf -y install glusterfs-server firewalld
sudo systemctl enable --now glusterd firewalld
sudo firewall-cmd --permanent --add-service=glusterfs && sudo firewall-cmd --reload

# 互信(在 nfs01 执行)
sudo gluster peer probe 154.64.254.91
sudo gluster peer status

# 创建砖与卷目录
sudo mkdir -p /gluster/wp-shared

# 创建副本卷并启动(在 nfs01):
sudo gluster volume create wp-shared replica 2 1.94.131.251:/gluster/wp-shared 154.64.254.91:/gluster/wp-shared force
sudo gluster volume start wp-shared
sudo gluster volume info wp-shared
2)Web 节点挂载 Gluster 卷
sudo dnf -y install glusterfs-fuse
sudo umount $UPLOADS || true
sudo mount -t glusterfs 1.94.131.251:wp-shared $UPLOADS
# 持久化
sed -i '\#wp-content/uploads#d' /etc/fstab
echo "1.94.131.251:wp-shared $UPLOADS glusterfs defaults,_netdev 0 0" | sudo tee -a /etc/fstab
sudo mount -a && df -h | grep wp-content
sudo chown -R nginx:nginx $UPLOADS
3)故障与自愈测试
# 模拟 nfs01 故障
sudo systemctl stop glusterd
# Web 节点继续写入
sudo sh -c "echo test-$(date +%F-%T) > $UPLOADS/ha-test.txt"
# 恢复并检查愈合
sudo systemctl start glusterd
sudo gluster volume heal wp-shared info
验证清单
- 单节点停机期间,上传/新增媒体仍成功;
- 恢复后
heal无异常 pending 条目; - 文件权限保持
nginx:nginx,无 403/写入失败。
常见坑 & 快速修复
- peer 状态不一致/卷创建失败:确保两端
glusterd已启动、端口放通,必要时gluster peer detach后重建; - 权限问题:存储端保证砖目录可访问(
nobody:nobody/755),Web 侧挂载点保留nginx属主。
回滚建议
- 临时回退到 NFS:修改
/etc/fstab为 NFS 行并mount -a; - 卷严重异常:停止业务写入,备份数据后重建卷。
统一故障排查方法论(4 步)
- 日志优先:Nginx/PHP/MariaDB/HAProxy/MaxScale/Gluster 各自错误日志定位根因。
- 分层验证:网络连通(
telnet/curl)→ 单点服务 → 组合链路。 - 权限一致:进程用户与目录属主一致;数据库授权匹配来源主机;
- 配置优先级:注意默认配置覆盖(如
default_server)。
附:实验手册
2. 以上工具的官方文档:
- CentOS Stream 9【16】 在“前置条件与约定”中
CentOS Stream 9处,添加:
CentOS Stream 官方文档 - Nginx 在 L1 阶段安装 Nginx 处添加:
Nginx 官方文档 - MariaDB 在 L1 阶段安装 MariaDB 处添加:
MariaDB 官方文档 - WordPress 在 L1 阶段部署 WordPress 处添加:
WordPress 官方安装指南 - HAProxy 在 L2 阶段安装 HAProxy 处添加:
HAProxy 官方文档 - Keepalived 在 L2 阶段配置 Keepalived 处添加:
Keepalived 官方文档 - MaxScale 在 L3 阶段安装 MaxScale 处添加:
MariaDB MaxScale 官方文档 - GlusterFS 在 L4 阶段安装 GlusterFS 处添加:
GlusterFS 官方文档
Comments NOTHING